The Unarmed Sneak Guide for the Fallout 2 Restoration Project
About
This is an in-depth guide for a stealth HtH playthrough for the Fallout 2 Restoration Project.
This build uses a Mega Power Fist and the Sneak skill (and a Stealth Boy) to remain almost completely invisible while dismantling your opponents one by one in close combat and then vanishing back into the shadows.
Table of Contents
- SPECIAL
- Traits
- Tagged skills
- Starting skills
- Developed skills
- Perks
- Special Perks
- Weapon Progression
- Armor Progression
- Chem Usage
- Sneak Mechanics
- Grenades
- Combat
- Routing
SPECIAL
| Starting | Developed | |
|---|---|---|
| ST | 5 | 6 |
| PE | 6 | 7 |
| EN | 4 | 4 |
| CH | 1 | 1 |
| IN | 9 | 10 |
| AG | 9 | 10 |
| LK | 6 | 8 |
Traits
- One Hander
- Kamikaze
Tagged skills
- Unarmed
- Sneak
- Speech
Starting skills
| Skill | Hard | Normal | Easy |
|---|---|---|---|
| Unarmed | 78 | 78 | 78 |
| Sneak | 42 | 52 | 72 |
| Speech | 15 | 25 | 45 |
| Lockpick | 15 | 25 | 45 |
| Throwing | 36 | 36 | 36 |
| Science | 26 | 36 | 56 |
| Repair | 17 | 27 | 47 |
Developed skills
| Skill | Points | Bonuses | Notes |
|---|---|---|---|
| Unarmed | 180 | +20 One Hander | 95% + 60% Aimed + 45AC = 200 |
| Sneak | 121 | +20 Stealth Boy | |
| Speech | 105 | Pip Boy Lingual Enhancer | |
| Lockpick | 105 | +40 Lockpicks | |
| Throwing | 120 | +20 One Hander | |
| Science | 105 | Big Book of Science | |
| Repair | 105 | +20 Tool | Deans Electronics |
Perks
| Level | Perk | Description |
|---|---|---|
| 6 | Bonus Move | +2 AP for movement |
| 6 | Silent Running | Running while in Sneak mode |
| 9 | Better Criticals | +20 to critical hit table |
| 12 | Lifegiver | +4 HP each level |
| 15 | Bonus HtH Attacks | Unarmed attacks cost 1 less AP |
| 18 | Action Boy | +1 AP |
| 21 | Action Boy | +1 AP |
| 24 | Slayer | All Unarmed attacks cause critical hits |
| 27 | Bonus Move | +2 AP for movement |
Special Perks
| Location | Perk | Description |
|---|---|---|
| New Reno | Prizefighter | +5 DR [normal] |
| Vault City → Redding | Dermal Impact Assault Enhancement | +10 DR [normal/explosive] / CH-1 |
| Vault City → Redding | Phoenix Assault Enhancement | +10 DR [fire/laser/plasma] / CH-1 |
Weapon Progression
| Location | Weapon | Damange | AP | Bonuses | |
|---|---|---|---|---|---|
| 1 | Klamath | Spiked Knuckles | 4-12 | 3 | One Hander |
| 2 | Broken Hills | Power Fist | 12-24 | 3 | One Hander, Weapon Penetrate |
| 3 | New Reno | Mega Power Fist | 20-40 | 3 | One Hander, Weapon Penetrate |
Armor Progression
| Location | Armor | AC | DR | DT | |
|---|---|---|---|---|---|
| 1 | Klamath | Leather Armor | 15 | 25 | 2 |
| 2 | Vault City | Metal Armor | 10 | 30 | 4 |
| 3 | Toxic Caves | Combat Armor MkII | 25 | 40 | 6 |
| 4 | San Francisco | Brotherhood Armor | 20 | 40 | 8 |
Feel free to pickup the Power Armor in Navarro if you'd like.
Chem Usage
Buffout is needed to reach certain ST/EN requirements during the game:
| Location | Details | Benefits | |
|---|---|---|---|
| 1 | Vault City | Open stuck door in Vault 8 | Metal Armor, ST+1 Memory Module |
| 2 | Broken Hills | Arm wrestle Francis | Power Fist |
| 3 | New Reno | Sleep with Mrs. Bishop | Pip Boy Lingual Enhancer |
| 4 | N/A | Level 24 | Slayer |
Psycho is not strictly required but can help with some of the more difficult combat encounters (i.e. vs Miniguns and Gauss weapons).
Sneak Mechanics
Sneak skill
The cornerstone of this build is the Sneak skill and its interaction with the singular Stealth Boy you can find as part of the Restoration Project.
The Sneak skill has a couple of interesting breakpoints. The most important one by far is Sneak 121 that lowers the perception range of NPCs by 1 (one hex).
Beside that, Sneak has breakpoints that lowers the Sneak retry timer after an unsuccessful Sneak;
although it could be argued it's efficacy is limited as you should not fail many sneak checks at Sneak 121. See the Sneak retry table for details.
The Stealth Boy grants a +20 bonus to Sneak when active which could be used to reach certain Sneak breakpoints, but more importantly it allows for sneaking in front of NPCs at much closer ranges than without one.
When combined with knowledge about the NPC perception range you can plan your combat in such a way that you'll be able to exit combat while sneaking when you normally wouldn't be able to (i.e. with active threats still in your vicinity). This is extremely helpful in random encounters.
The map illumination level has no effect on sneaking, so you won't be able to sneak more successfully during the night.
NPC perception range
You need to stay outside of the NPC perception range in order to stay undetected. What complicates things is we don't know the PE value of a given NPC and the best we can do is make educated guesses (outside of looking up every enemy you encounter on the wiki).
Perception range of NPC with PE 1-10 with Sneak skill >120 on successful Sneak
| Location | PE 1 | PE 2 | PE 3 | PE 4 | PE 5 | PE 6 | PE 7 | PE 8 | PE 9 | PE 10 |
|---|---|---|---|---|---|---|---|---|---|---|
| In front of NPC | 0 | 1 | 2 | 4 | 5 | 6 | 7 | 9 | 10 | 11 |
| In front of NPC using Stealth Boy | 0 | 0 | 0 | 1 | 2 | 2 | 3 | 4 | 4 | 5 |
| Behind NPC in combat | 0 | 0 | 0 | 1 | 1 | 2 | 2 | 3 | 3 | 4 |
| Behind NPC not in combat | 0 | 0 | 0 | 0 | 0 | 0 | 0 | 1 | 1 | 1 |
Perception range formula
PerceptionRange = NPC Perception x Location x Sneakiness - SneakLevel
| Value | Description | |
|---|---|---|
| Location | 5 | In front of NPC |
| 2,5 | In front of NPC using Stealth Boy | |
| 2 | Behind NPC in combat | |
| 1 | Behind NPC not in combat | |
| Sneakiness | ¼ | Sneaking successfully |
| ⅔ | Sneaking unsuccessfully | |
| SneakLevel | 1 | Sneaking successfully and Sneak >120 |
| 0 | Sneaking unsuccessfully or Sneak ≤120 |
Sneak failure retry time
| Sneak skill | seconds |
|---|---|
| 0-80 | 60 |
| 81-100 | 40 |
| 101-135 | 30 |
| 136-170 | 20 |
| 171-200 | 15 |
| 201-250 | 12 |
| 251-300 | 10 |
Successful Sneak lasts 60 seconds.
Grenades
Grenades are used to supplement the build in situations where HtH combat could be disadvantageous. See Battles.
Some of those situations involve robots and/or defence turrets, both of which are extremely susceptible to Pulse grenades.
Plasma grenades can be useful in tight places where (non power-armored) enemies tend to clump together and for baiting enemies into a more advantageous position for you to fight them in; or better yet just kill them outright (i.e. Melchior the Magnificent).
Chance to Hit
ChanceToHit = Throwing skill + One Hander Bonus + (PE-2)*8 - Range*4
| Throwing skill | Perception | Range | ChanceToHit |
|---|---|---|---|
| 120 | 7 | 5 | 160 - Target AC |
| 120 | 7 | 10 | 140 - Target AC |
| 120 | 7 | 15 | 120 - Target AC |
Chance To Hit is capped at 95% after target AC and other modifiers have been subtracted.
Damage
| Grenade | Damage | AP | Damage Type |
|---|---|---|---|
| Plasma grenade | 40-90 | 4 | Plasma |
| Pulse grenade | 100-150 | 4 | EMP |
Combat
Fighting Style
The general fighting style of this build is to sneak up on your enemies one at a time and eye-punch them to death, preferably without being detected by other enemies.
Familiarize yourselves with the NPC perception range table to get a feel for how close you can generally get to enemies and from which direction to approach them from (front vs. back). You'll want to use your Bonus Move AP to close the last hex or two of distance before you initiate combat.
Against ranged humanoid enemies, especially in groups you should be using the Stealth Boy, then sneak behind each one and eye-punch them to death. If you have additional AP after each kill you should move away from the nearest enemies to maximize then chance at getting out if their perception range. If no other enemies detect you then you'll be able to end combat after each kill and move on to the next one.
Against creatures (everything from Ants to Wanamingos and Deathclaws) use your Sneak skill to get moderately close to them and attempt to have them initiate combat (i.e. toggle Sneak on and off) only to have them spend all their AP closing the distance towards you. Then due to our high Sequence we get two turns in a row which we can spend using aimed punches to their eyes — or whatever eye-equivalent they might have.
Against robots and defence turrets the most effective strategy is frying them with Pulse Grenades.
Random Encounters
Always keep your Stealth Boy in one of your two active slots when traveling on the world map so you can initiate Stealth Boy Sneak for only 2 AP. Once sneaking you should use all of your remaining AP to get as far away from the enemies as you can and try to end combat. If you can't end combat on your first turn, then you'll be able to on your second combat round after you put additional distance between you and your enemies.
After you end combat you are free to sneak around the map and take care of all the enemies one by one. Again, familiarize yourselves with the NPC perception range table.
Battles
| Location | Battle | Notes | |
|---|---|---|---|
| 1 | Klamath | Rat caves | |
| 2 | The Den | Tyler's Gang | |
| 3 | Toxic caves | Sentry bot | Pulse Grenades |
| 4 | The Den | Slavers Guild (Metzger and crew) | Stealth Boy |
| 5 | Slaver's Camp | Slavers | Stealth Boy |
| 6 | Redding | Frog Morton's Gang | Stealth Boy |
| 7 | Redding | Wanamingo Mine | |
| 8 | EPA | Wanamingos | |
| 9 | Sierra Army Depot | Auto-cannon turrets | Stealth Boy, Pulse Grenades |
| 10 | Raider Cave | Mercenaries | Stealth Boy |
| 11 | NCR | Slavers (Vortis and crew) | |
| 12 | Vault 15 | New Khan Raiders | Stealth Boy |
| 13 | Military Base | Super Mutants | Stealth Boy, Plasma Grenades, Psycho |
| 14 | Military Base | Melchior and Deathclaws | Plasma Grenades |
| 15 | Navarro | Enclave Soldiers and Gun Turrets | Stealth Boy, Pulse Grenades |
| 16 | San Francisco | Wanamingos, Centaurs and Floaters | |
| 17 | San Francisco | Hubologists | |
| 18 | San Francisco | Dr. Shen and his Plant Zombies | Stealth Boy |
| 19 | Oil Rig | Enclave Soldiers, Auto-cannon turrets and Sentry bots Mark II | Stealth Boy, Pulse Grenades, Psycho |
| 20 | Oil Rig | Frank Horrigan |
Routing
Generally speaking, do all quests at each location unless otherwise noted.
The Nearly Ultimate Fallout 2 Guide is a fantastic resource for a detailed walkthrought of the game, including all of the quests in the original Fallout 2 release.
The Fallout 2 Restoration Project Supplementary Guide is a similar resource that covers quests added by the Restoration Project and are not included in the Nearly Ultimate Fallout 2 Guide.
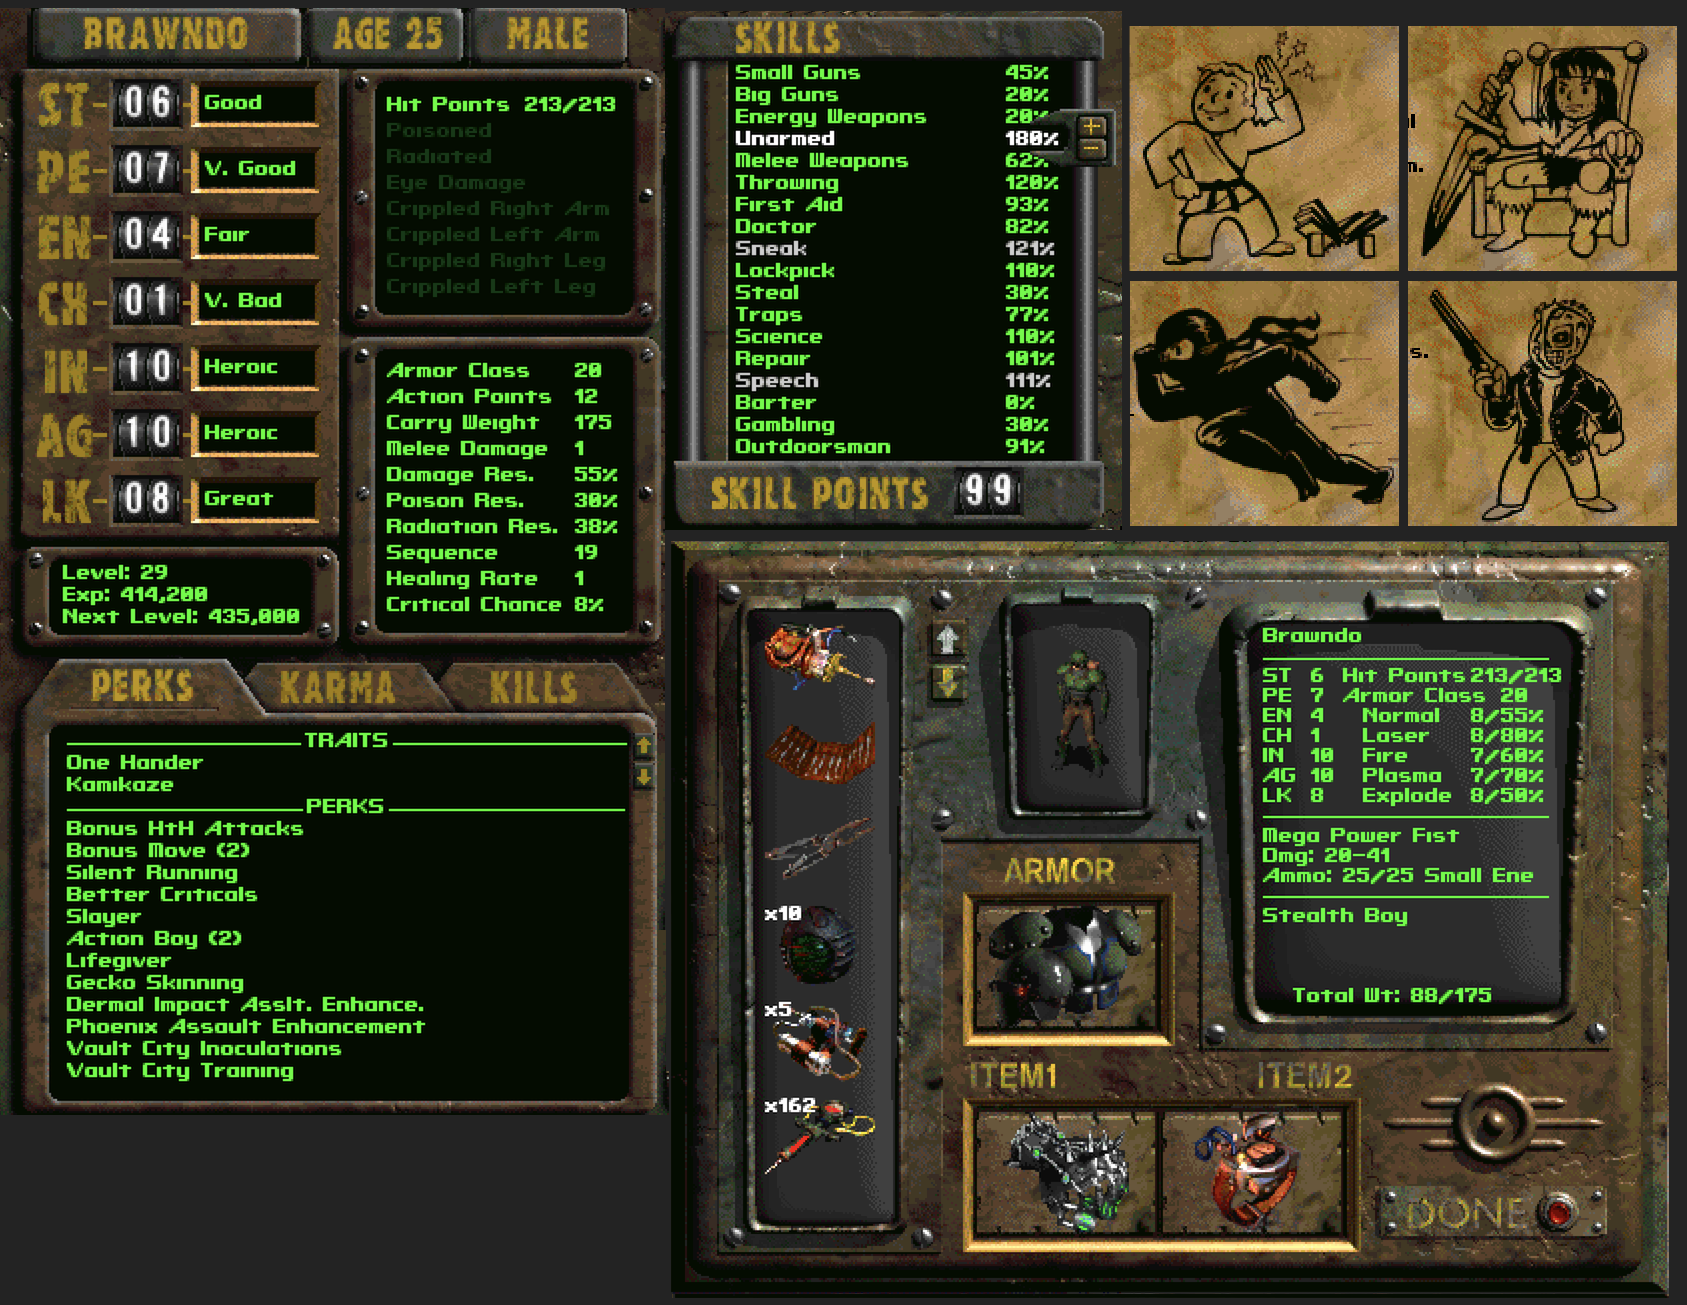
You should be between level 27 and 30 when you enter the Enclave Oil Rig (unless your grinding random encounters for XP). The screenshot shows the stats, skills and inventory after just arriving on the Enclave Oil Rig.
| Location | Notes | Requirements |
|---|---|---|
| Arroyo | Shovel | |
| Klamath | +10 Unarmed, Leather Armor, Spiked Knuckles, Crowbar, Tool, Fuel Cell Regulator, Rubber Boots, Skip Toxic Caves for now | |
| Den | Buffout, Do everything except killing the Slavers Guild | 120 Unarmed, 80 Speech |
| Modoc | Buffout | |
| Ghost Farm | ||
| Vault City | Metal Armor, ST+1 Memory Module, Computer Voice Module, Motion Sensor, Wrench, Super Toolkit | 65 Lockpick, Buffout, Tool, Wrench |
| Gecko | Fuel Cell Controller, Lockpicks, Tool | Super Toolkit |
| Abbey | Stealth Boy | |
| Den | Highwayman and Fuel Cell Regulator upgrade | $2750, Fuel Cell Controller, Fuel Cell Regulator |
| Broken Hills | Radscorpion Glasses, Power Fist, Buffout | Buffout |
| New Reno | +5 Unarmed, +10 Doctor, +10 Speech, Electronic Lockpick, Pulse Grenades, Mirrored Shades, Buffout, Upgrade Power Fist, Discover SAD location, Discover Raider Cave location | 140 Unarmed, Shovel, Buffout |
| Stables | Jet cure dialog, Discover EPA location | 76 Science |
| Toxic Caves | Combat Armor MkII | 65 Repair, 85 Throwing, Electronic Lockpick, Pulse Grenades, Rubber Boots |
| Den | Kill the Slavers Guild | Better Criticals, 101 Sneak, 150 Unarmed |
| Redding | 160 Unarmed | |
| EPA | AG+1 Special Syringe, +10 Sneak, +10 Lockpick, Electronic Lockpick MKII | Rope |
| Sierra Army Depot | IN+1 Memory Module, +8 Unarmed | Pulse Grenades |
| Raider Cave | Kill everyone | Bonus HtH attacks, 121 Sneak, 50 Outdoorsman, Motion Sensor |
| Vault City | Bring Jet sample, Jet cure dialog, Learn about Combat Implants, Get Jet Antidote, Raiders dialog | 75 Doctor, Jet |
| NCR | LK+2 Zeta Scan, Highwayman Blower Upgrade | |
| Vault 15 | Kill the Khans, Vault 15 computer parts, NCR Spy Holodisk, Don't turn the quest in at NCR yet | |
| Vault 13 | G.E.C.K, NavCom parts | Computer Voice Module |
| Military Base | Just grab PE+1 Memory Module and leave | |
| Navarro | CH+1 Memory Module, Vertibird Plans, Expanded Lockpick Set | |
| San Francisco | Just grab the Brotherhood Armor and use ACE | ST+1, PE+1, CH+1 and IN+1 Memory Modules, Vertibird Plans |
| Vault 13 | Learn about the Deathclaws' demise | |
| NCR | Hand in Vault 15 quest and sell Vault 13 location information for $20000 | Vault 15 computer parts, NCR Spy Holodisk |
| Redding | Get all 4 Combat Implants, Turn in Jet Antidote | $91000, 4x Combat Armor, Jet Antidote |
| Military Base | Kill everyone | Slayer |
| Navarro | Tanker FOB, Kill everyone | Pulse Grenades |
| San Francisco | Tanker FOB, NavCom parts | |
| Oil Rig | Kill everyone | 180 Unarmed, Pulse Grenades |